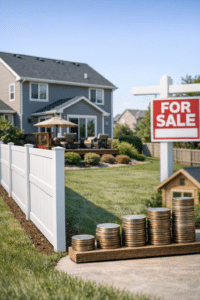
How to Build a Dog Fence: A Step-by-Step Guide to Safe, Secure Containment
Building a reliable dog fence is one of the best investments you can make in your pet’s safety and your peace of mind. With the right planning, materials, and installation techniques, you can create a secure boundary that keeps your dog happily contained while protecting your landscaping and giving your family freedom to enjoy the yard. This guide walks you through every stage of dog fence installation—from selecting pet-safe fencing materials to finishing touches—so you can choose the best dog containment options for your yard and your pup’s personality.
Plan Your Dog Fence Installation
Every successful fence starts with a smart plan. A thoughtful layout will save you time, money, and headaches during construction and for years to come.
Check Local Rules and Utilities
Before you dig a single post hole, verify local zoning rules, HOA guidelines, and property setbacks. Contact utility location services to mark underground lines. This step is essential for safety and compliance and helps you avoid costly surprises once your dog fence installation is underway.
Assess Your Dog’s Size, Breed, and Behavior
Design your fence around your dog’s habits:
Jumpers: Choose at least a 5–6 ft fence for athletic or large breeds. Consider adding “coyote rollers” or an inward-angled top rail to discourage climbing.
Diggers: Plan an anti-dig barrier by burying wire mesh 12–18 inches deep or installing an above-ground L-shaped footer that extends inward along the ground.
Chewers and Pawers: Select sturdy, chew-resistant materials (welded wire, steel, or solid wood) and avoid large gaps or protruding fasteners.
Small Breeds: Keep picket spacing tight (2–3 inches) and ensure no openings under gates or panels.
Map Your Layout
Sketch the yard perimeter, mark gate locations, and note slopes, trees, and drainage flows. On-site, use stakes and mason’s line to outline the fence and square the corners. Account for a wide main gate (at least 48 inches) for mowers and deliveries, and consider a double-gate “airlock” if your dog is a door-dasher.
Compare Dog Containment Options
Choosing the right style is key to a safe, low-maintenance fence. Here’s how the main dog containment options stack up.
Physical, Pet-Safe Fencing Materials
Physical barriers remain the most dependable route for security and peace of mind:
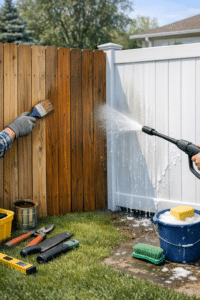
Wood (privacy or picket): Attractive and customizable. Use rot-resistant lumber and smooth finishes. Add hardware cloth at the base to stop digging.
Vinyl (PVC): Low-maintenance and clean-looking. Choose reinforced panels and secure posts well in high-wind areas.
Chain-Link: Durable and budget-friendly. Consider privacy slats and bottom tension wire or buried mesh for diggers.
Welded Wire/No-Climb Mesh on Wood or Metal Frames: Excellent visibility with small openings that prevent escape and chewing. Ideal for pet-safe fencing upgrades around gardens.
Ornamental Steel/Aluminum: Strong and long-lasting. Ensure picket spacing is small enough for your dog’s head and chest.
Electronic and Hybrid Systems
Invisible or electric systems can help with training but are not a substitute for a physical barrier. They don’t keep wildlife or stray dogs out, and not all pets respond well to correction collars. If you consider electronics, use them only as a backup to physical pet-safe fencing, and always follow a structured training plan.
Tools and Materials Checklist
Gather everything before you begin dog fence installation:
Materials: Fence posts (corner, line, and gate posts), concrete mix, gravel, rails or panels, mesh or pickets, gate kit (hinges, latch, posts), screws/fasteners, tension wire or bottom rail, heavy-duty staples or fencing clips, anti-dig barrier (hardware cloth or welded wire), post caps, safe exterior-grade stain/paint or rust-resistant coating.
Tools: Tape measure, marking paint, stakes and string, post hole digger or auger, wheelbarrow, level, speed square, circular saw, drill/driver with exterior screws, fencing pliers, hammer, tin snips/bolt cutters (for wire), line level, shovel, tamper, safety gear (gloves, eye and hearing protection).
Step-by-Step Dog Fence Installation
Follow these steps for a sturdy, long-lasting build that prioritizes pet-safe fencing practices.
1) Measure, Mark, and Prepare
Measure the total perimeter to estimate materials. Mark your fence line with stakes and string, then identify gate openings. Clear vegetation and level high spots to create a consistent grade. Plan for drainage: leave small weep gaps or contour the bottom rail if your yard holds water.
2) Set Corner and Gate Posts
Corner and gate posts bear the most stress, so set them first and deepest. Dig holes 1/3 the post length (often 24–36 inches), wider at the base than the top. Add 4–6 inches of gravel for drainage. Plumb posts with a level and pour concrete, sloping the top to shed water. Let them cure according to the manufacturer’s directions before hanging heavy gates or stretching mesh.
3) Install Line Posts
Mark consistent spacing (typically 6–8 feet for wood or mesh, 8–10 feet for chain-link, per product specs). Keep posts aligned with your string line and check level and height as you go. Backfill with tamped soil or concrete depending on wind loads and soil type.
4) Attach Rails, Panels, or Stretch Mesh
Wood/Composite: Fasten top and bottom rails first, then add mid rails if needed. Install pickets with consistent spacing, pre-drilling to avoid splits. Keep fasteners flush to prevent snags.
Welded Wire/No-Climb Mesh: Unroll mesh along the fence line. Attach from a corner, tensioning as you go. Staple to wood posts or use clips on metal posts. Add a bottom rail or tension wire to keep mesh taut and reduce gaps.
Chain-Link: Install top rails, then stretch fabric from a tension bar at a terminal post. Use tension bands and tie wires at consistent intervals. Add bottom tension wire to resist push-outs.