How to Install Fence Wire for Security: A Complete Step-by-Step Guide
Looking to strengthen your property’s perimeter and deter intruders? Installing security fence wire is one of the most cost-effective ways to upgrade safety, define boundaries, and protect assets. This comprehensive guide walks you through planning, material selection, and wire fencing installation—from setting posts to tensioning wire—so you can build durable, protective fencing that stands up to weather, wear, and attempted breaches.
Plan First: Codes, Layout, and Utilities
Effective security starts with smart planning. Before you dig a single hole, make sure you’ve addressed the essentials:
- Check local regulations and HOAs: Fence height, placement, and top treatments (like barbed wire or outriggers) are often regulated. Razor wire and electrified strands may be restricted or require permits.
- Mark property lines: Use a recent survey or consult local records to avoid encroachment disputes.
- Locate underground utilities: Call your local utility marking service to identify buried lines before post digging.
- Define your security goals: Do you need anti-climb, anti-cut, or anti-dig features? The answer determines your wire type, fence height, and layout.
Choose the Right Security Fence Wire
The best security fence wire choice balances visibility, strength, and budget. Consider these common options for protective fencing:
1. Welded Wire Mesh (9–12 gauge)
Panels or rolls with square/rectangular openings (1×1 in or 2×2 in). Heavier gauges resist cutting and deformation. Great for residential and light commercial wire fencing installation. Look for hot-dip galvanized or PVC-coated finishes for corrosion resistance.
2. Woven Wire (Field/No-Climb)
Knotted or fixed-knot mesh with smaller apertures near the bottom. “No-climb” styles (2×4 in spacing) add anti-climb benefits without barbed wire.
3. High-Tensile Smooth Wire (Multi-Strand)
Multiple smooth wires tensioned between braced posts. Cost-effective and fast to install. For security, pair with tight spacing, a bottom apron, and possibly an electrified deterrent where legal.
4. Barbed Wire and Outriggers (Where Allowed)
Often used atop other fences to deter scaling. Always verify legality before use. Consider 3–6 strands on angled outriggers for added protection.
Finish and Durability
- Galvanization: Class 3 or hot-dip for long-term rust resistance.
- PVC or powder coating: Adds protection and reduces glare for discreet security.
Tools and Materials You’ll Need
Gather everything in advance to streamline your wire fencing installation:
- Posts: Pressure-treated wood posts (4–6 in corners/terminals, 3–4 in line) or galvanized steel T-posts.
- Concrete & gravel: For setting corner, gate, and terminal posts.
- Wire and fittings: Your chosen security fence wire, tension wire (top/bottom), tension bands, brace wire, hog rings, T-post clips, and fence staples.
- Bracing hardware: Brace rails, diagonal brace wire, turnbuckles or ratchet strainers, and tie wire.
- Tools: Post hole digger or auger, level, measuring tape, string line, T-post driver, fencing pliers, staple gun or hammer, come‑along, stretcher bar or gripple system, wire cutters, hog ring pliers, and line level.
- Safety gear: Heavy gloves, eye protection, long sleeves, and steel-toe boots.
Site Prep: Layout and Marking
Clear a fence corridor at least 3–4 feet wide. Mow or trim vegetation, remove rocks and debris, and grade for drainage where necessary. Mark your line with stakes at corners and intervals, then run a taut mason’s line between stakes to ensure a straight, professional-looking run.
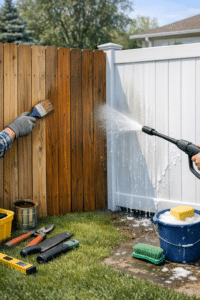
Step-by-Step Wire Fencing Installation
1. Set Corner and Terminal Posts
- Depth: Bury at least one-third of the post length (typically 24–36 in) and widen diameter to 3× the post width. Add 4–6 in of compacted gravel for drainage beneath each hole.
- Concrete: Set posts in concrete for maximum stability. Crown the concrete to shed water, and verify posts are plumb in both directions. Allow proper cure per manufacturer guidance.
- Spacing: Plan line posts 8–10 ft apart for mesh and 12–20 ft for high-tensile strands (terrain and wind exposure may require tighter spacing).
2. Build Strong Brace Assemblies
Corner and gate posts need braces to hold wire tension without leaning.
- H-brace: Install a brace post 6–8 ft from the corner/terminal. Add a horizontal brace rail near the top and a diagonal brace wire from the top of the corner post to the bottom of the brace post. Tighten the diagonal wire with a twitch stick, ratchet, or turnbuckle.
- Double H-brace: For long pulls (over 660 ft) or steep terrain, use double braces.
3. Install Line Posts
- Wood posts: Set in tamped soil or concrete depending on soil stability. Keep tops aligned with a string line for a uniform look.
- T-posts: Drive to a depth of 18–24 in. Face the studs toward the wire. Maintain consistent height and alignment.
4. Add Top and Bottom Tension Wires
Run a galvanized tension wire near the top rail height and 2–4 in above grade at the bottom. Secure with ties or bands at terminals and clips or hog rings to line posts. This step enhances protective fencing by reducing sag, deterring lift, and tightening the perimeter.
5. Hang and Tension the Wire Mesh (or Strands)
For welded or woven mesh:
- Unroll along the fence line: Keep the roll flat to reduce kinks. Start at a corner/terminal post.
- Attach at the starting post: Use a stretcher bar or tensioning panel to grip the full height of the fabric, then secure with tension bands, staples (for wood), or heavy-gauge ties.
- Tension evenly: Using a come‑along and stretcher bar, pull until the mesh is taut and wrinkles disappear, avoiding over-tension that could distort the grid.
- Fasten to line posts: Use T-post clips or tie wire every 12–18 in vertically. Attach the mesh to top and bottom tension wires with hog rings every 12–18 in on straight runs and closer on corners.
- Join rolls: Overlap at least one full vertical wire and splice by weaving or with appropriate wire ties for a secure, tamper-resistant seam.
For high-tensile multi-strand:
- Run each strand through end post ins